A lot of adult beginning cello players start learning the instrument and they quickly realize they absolutely love it. Everything is going great; they’ve learned first position and are comfortable moving around the cello in this lower position. Then comes the next lesson in the method book (or the cello course), and something called extensions appears on the page. The diagram of the hand on the fingerboard looks a bit more complicated and maybe even a little scary.
 The student takes a look and says, “Wow, I don’t think I’m cut-out for this. This is too hard. I didn’t know it was going to be this painful or that the stretch was going to be that intense in my hand.” There is a brief though about quitting the cello.
But don’t quit! There are four simple tricks you can do to make extensions so much easier!
And if you’re thinking, “Wait, what what are you talking about? What is an extension?” An extension is just what it sounds like. Cellists must extend, or stretch our fingers so we can move around the fingerboard easier and and get more notes without having to shift so much.
And if you are wondering why you are having so much trouble with extensions, the simple answer is because you’re probably not doing it correctly. If it’s hard or if it hurts, it’s probably wrong at this point.
Two Types of Cello Extensions:
There are two different kinds of extensions when we play the cello.
- We have back extensions
- and forward extensions.
A back extension is when we extend our 1st finger back towards the scroll.
A forward extension is when we extend our fingers out in the direction of the bridge.
Before we get started I need to get some housekeeping out of the way.
There are some basic things which need to be in place for you to perform extensions correctly.
The cello:
Getting the right size cello for the player is probably the most important strategy for learning successful extensions. If you’re finding that you’re really struggling and you’re pretty sure that you are extending correctly, there’s a good possibility that you have an instrument that is simply too large for your body. If you’re a small person with small hands, you should not be playing on a full-size instrument – and you may even find a 7/8 is too large. But, take a deep breath… you can make this work. Plan a visit with your local string shop. Talk about upsizing if you are renting or trading in your cello if that have that option.
Your Warm-Up:
The next item is to make sure that you warm your hands up before you play. This should be a regular part of your routine. You can’t expect your hands to work properly when cold. Here are a few excellent hand stretching exercises:
First – I like to take my right hand and pull apart each set of fingers on my left hand. Stretch those fingers out hold them for a minute.
Next – I place my left hand on a tabletop and lift up each finger individually, holding the finger up for about 10 seconds it so I can stretch out the base of my knuckles. You can actually feel your muscles relaxing and extending when you do this!
4 tricks for Easier Cello Extensions:
- Use the Thumb Correctly.
Old-school teaching basically said that the thumb was the key ingredient for easy shifting. A lot of folks focused solely on the thumb in method books, but the thumb is just one piece of the puzzle. Your thumb needs to be loose and supple. Often times adult cello players tend to have a “death grip” on the cello, and what that does is it creates too much counter pressure between the thumb and the fingers. The hand is locked so tight that it’s very hard to extend, or move AT ALL!
When you do a forward extension, the thumb will slide along the neck, simultaneously with the 4th finger in the direction of the bridge.
The weight of the hand sinks in to the fingerboard through the fingers.The thumb is relaxed – it’s almost floating. The thumb should be able to move around the back of the neck very comfortably. A soft thumb which is pliable and flexible can move with the rest of your hand.
- Correct Pronation of The Left Hand.
This is a common issue that I see with adult beginners. There is a tendency to have the hand pronated back a bit too far towards the scroll. Correct this by turning and supinating the position of the hand to be more at a perpendicular angle to the strings. You’ll see that your fingers can stretch quite a bit more in this position. It’s also wise to check and see if you have that really nice “C” shape in your left hand. There should also be a tunnel between your fingers and the neck – some good space in there.
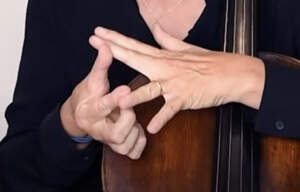
- Pivot From the Second Finger.
Your second finger is in the middle of your hand. It’s like the footing which helps propel you to the other side. The second finger helps you pivot. Place second finger on the fingerboard and lift first and fourth fingers. See what it feels like to rotate back and forth – just like a teeter-totter. That pivot will help you reach an extension easier.
- Extend with the Whole Arm
That’s right. The fingers, palm and arm are all one piece. We have a tendency to think of fingers as separate from the hands and separate from your forearm and perhaps separate from your shoulder – but you have to start thinking that they are truly all connected. It’s one big piece and they work together like a well-crafted machine. Imagine your pinky goes all the way to your elbow and it all has to reach together as a single unit. The hand will be able to reach so much farther just by bringing the elbow and arm forward to help the hand reach the note.
Here is where the thumb’s role is really crucial. As the elbow comes forward, the thumb will slide over to the A string side of the neck. The thumb helps the elbow move.
If you practice these four tricks, you’ll find that extensions become easier and easier. Remember to think about your whole arm as part of the puzzle.
Check out my YouTube channel is you would like to watch more lessons on cello pedagogy.